The post What to Put Your Fabric Bed On appeared first on Grassroots.
]]>
Ensuring Adequate Soil Moisture
When growing with the living soil approach, it’s important to not overwater. This is the most common mistake for new living soil growers. It is good to have a few drops of water coming off the bottom or lower side walls of the fabric bed. Depending on your soil masses or mixture of soil media, you may need to use a soil moisture probe or monitor to manage the soil moisture. We suggest using a blumat irrigation system in conjunction with a tensiometer soil moisture meter. This can be done on a gravity-fed revisor or pump system for larger set ups. Other options include a multiple zone irrigation system leading to manifolds for drip lines. Drip lines or emitters should be six to 12 inches apart in length and width.
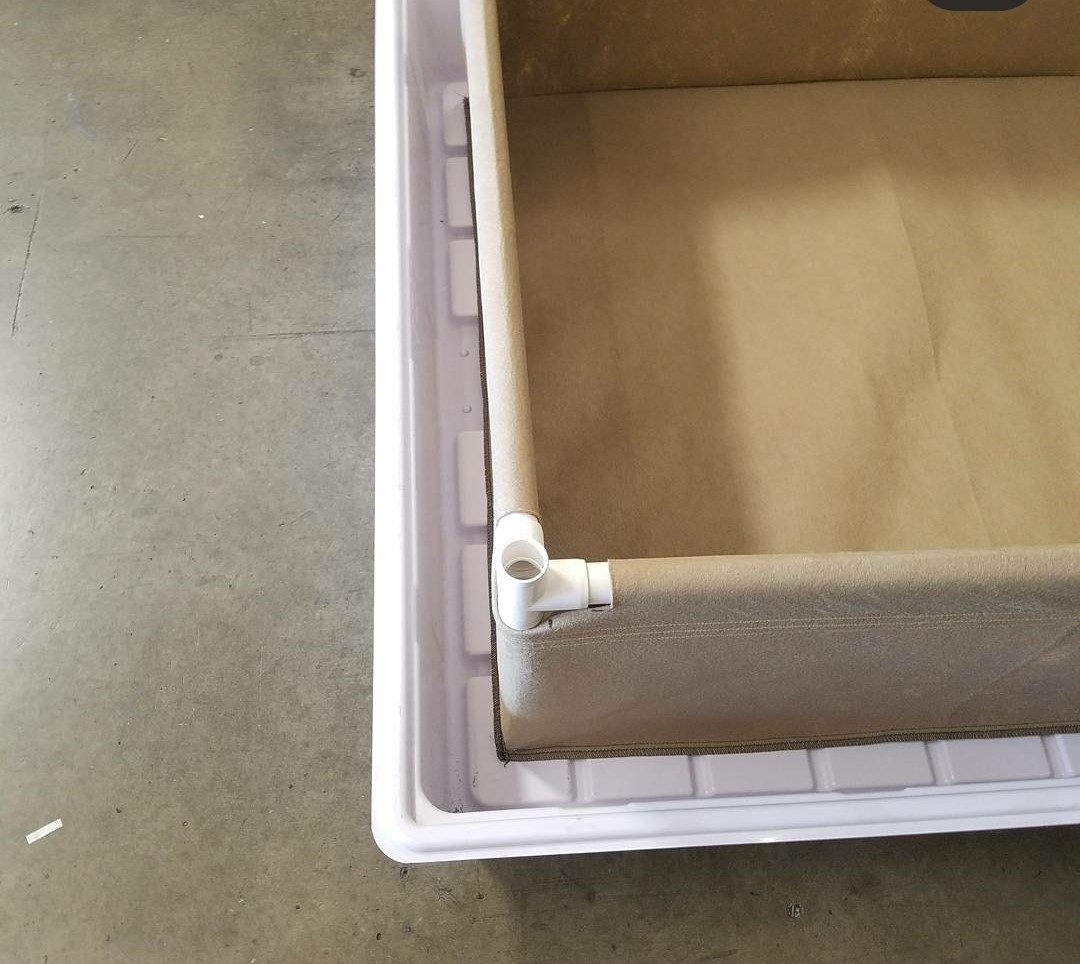
Encouraging Drainage in Plastic Trays
When using a plastic drain tray, we highly suggest filling the bottom with pumice rock or Hydroton clay balls. This will allow any excess water to leave the fabric bed and exit the drain tray, or simply dry out due to low amounts of run-off.
Instead of pumice or Hydroton clay balls, some customers have also had success with plastic snap tiles, commonly used around kitchens, pools, and garages. This is another great option to allow the highest level of air flow below the bed and provides ideal protection against anaerobic conditions.
To purchase drain trays for your fabric raised bed, talk to your local garden supply retailer.
The post What to Put Your Fabric Bed On appeared first on Grassroots.
]]>The post How to Assemble Fabric Bed appeared first on Grassroots.
]]>
What You’ll Need
The following items are included with the purchase of your Grassroots fabric bed:
- Fabric bed
- PVC fittings
- Screws
These items are required but are not included:
- 1” PVC pipe (We recommend buying 20-foot sections to minimize waste.)
- Mallet or hammer
- File or sandpaper
- Drill
How to Assemble
[Embed video]
- Start with the beds on a flat surface. You will begin by cutting the legs of the frame.
- Pull a corner of the bed up and place a piece of PVC pipe inside the bed vertically.
- Pull the side fabric tight and cut the PVC where it meets the horizontal sharpie line near the top of the side.
- This piece will become a leg. You can now cut the rest of the legs to this length. There will be one leg for every notch.
- Put the proper fittings on to the legs. We will attach crossbars to them in a couple steps. Note: If you don’t have trellis fittings, you will use 3- and 4-way fittings instead of the 4- and 5-way fittings shown.
- Use a metal file or sandpaper to smooth the bottom of the legs. This will help the pipe fit all the way into the fittings and not get caught on fabric. This is especially important if you used a saw to cut the PVC.
- It’s time to cut the crossbars. Put a piece of uncut PVC through an end sleeve and cut at the vertical markings.
- You can use this length to make as many crossbars as you need.
- Place the end crossbars into their sleeves and fit the corner legs and fittings onto them.
- Start from one side and thread an uncut piece of PVC through an empty sleeve into a leg joint. Make sure the fabric is taut and cut at the first vertical mark.
- Stick the next leg on and continue down the length of the bed until you reach the next corner joint.
- Use a mallet to seat the PVC into each join for a snug fit. Skipping this step may cause the frame to gradually loose stability.
- If you have trellis fittings, now is a good time to build the trellis. Use the lengths of piping already cut to measure piping for the top of the trellis. You can make your trellis as high as you need.
- Before filing, use the provided screws and drill to secure the pipes in the fittings. Make sure not to over tighten the screws!
Download a PDF of instructions here.
The post How to Assemble Fabric Bed appeared first on Grassroots.
]]>The post Choosing Your Soil appeared first on Grassroots.
]]>
What actually is soil?
Soil isn’t just a bag of dirt. It’s a blend of ingredients that together make up what we refer to as soil. Some common ingredients in soil include: moss, sand, vermiculite, perlite, pine bark, compost, and other natural ingredients.
The type of ingredients that you want in the soil depends on what you’re growing and what characteristics you need from the soil. Adding a removing certain ingredients can affect the soil’s ability to hold water, provide ventilation to the roots, and deliver nutrients So getting the right soil composition for your plants is really important.
How do I know good soil when I see it?
Regardless of what you are growing, there are some general traits that are desirable when seeking a quality soil blend. As a rule of thumb, you always want a soil blend that is easy to handle, lightweight, and has a good texture. Ideally, soil should be fluffy. This will make the soil easier to work with and will encourage maximum growth. A soil that is too dry will result in low water retention. A soil that is too dense and clumpy won’t be able to drain properly. An idea soil mixture will also be free of pathogens. Soil pathogens can be harmful to soil bacterial or contain weed seeds that might interfere with your plant’s growth.
Tips about Commercial Soil
If you aren’t sure about the exact requirements of your plants or if you’re growing several different types of plants at once, commercial grade potting soil and some mulch is a great option. Potting soil is usually premixed and contains a good combination of essential ingredients – like compost, sand, sphagnum peat moss, and fertilizers – that deliver nutrients to roots. With soil selection, you typically get what you pay for. So cheaper options aren’t necessarily the best route for your plants.
Local & Organic Soil
If you find that a generic commercial soil doesn’t meet your growing needs, we suggest purchasing from a local and organic soil from a local soil company. Like food, soil is best when it is locally sourced and organic. To ensure the highest quality and consistency, aim to decrease the number of middlemen between you and your soil producer. Typically, locally mixed soils produce the best results because they are free from debris, pathogens, and contaminants that can negatively affect plant growth.
Special Situations & Optimizing Your Soil
Certain plants are meant to thrive in specific soil and environmental conditions. For example, succulents are a type of desert plant that requires soil with good water drainage.
After deciding what soil works best for your needs, do a trail run and take notes on the performance. When you notice that a soil mix performs well, then stick with it. If the soil you are using isn’t producing your desired results, consider Microbe & Plant Food soil amendments. If you still aren’t finding success, you can always ditch the soil all together, wash and reuse your fabric container, and start again.
The post Choosing Your Soil appeared first on Grassroots.
]]>The post Growing Phases appeared first on Grassroots.
]]>
Pre-plant Phase
The pre-plant phase is the period for reinvigorating the soil. Whether your garden of fabric pots or beds is new or established, you can nurture the soil food web long before planting. If you already have an established garden and are utilizing the no-till approach, this is also the period when the roots from your previous crop are composting.
During this phase, consider planting cover crops like clover, vetch, or fava beans to improve soil health, enhance water availability, increase biodiversity, and even attract pollinators. To further nurture the soil food web, consider some soil amendments during this phase.
Soil Amendments During Pre-plant Phase:
Mix 1 gallon of water with 100/ml of Microbe Builder and ½ cup of SuperFood Mycorrhizae. Apply directly to the soil with a foliar sprayer to condition the soil.
Seed (Clone) Phase
The seed phase is when you should be planting and germinating seeds for your next crop. What and where you are growing determines when you should start your seeds. As an alternative to seed germination, some gardeners grow from clones. That means taking a cutting from an established plant and helping it take root.
Whether germinating seeds or growing from clones, consider starting indoors in small fabric pots, like our 1-gallon Transplanter or Bottomless. Fill your pots with soil from a fresh bag of seed-starting mix. Regular potting soil isn’t ideal in this phase. Also, consider soil amendments to further encourage seed germination.
Soil Amendments During Seed Phase:
Mix 1 gallon of water with 100/ml of Microbe Builder and ½ cup of SuperFood Mycorrhizae. Apply directly to the soil with a foliar sprayer to support seed germination.
Transplant Phase
The transplant phase is when you’ll take your seedling or rooted clone and move it to a larger fabric pot or bed. If you plan to grow outdoors, transplant is typically after the last frost. The act of transplanting can put a lot of stress on a seedling. These baby plants can be at risk of transplant. If you’ve grown your seedlings in our Transplanter or Bottomless pots, much of the shock of transplanting is avoided. To further support your seedlings, consider taking some other preventative measures.
Soil Amendments During Transplant Phase:
To condition the soil prior to transplanting your seedlings, mix SuperFood Mycorrhizae in powder form directly in the soil. Use 1 Tbsp of SuperFood Mycorrhizae per yard of soil.
Mix 1 gallon of water with 100/ml of Microbe Builder and ½ cup of SuperFood Mycorrhizae. Remove your seedling from the Transplanter pot and dip the entire root ball in the mixture immediately before planting in a larger fabric pot or bed. This will help reduce transplant shock.
Vegetative Phase
Once roots are established, your plants begin to focus on new above-ground growth. During this vegetative phase, your plants are growing significantly in height and size overall. Plants are also actively engaged in photosynthesis. Actions taking in this phase ultimately determine the size, shape, and yields of your mature plants. In the vegetative phase, it is critical that your soil and plants have all the nutrients needed for flowering and reproductive growth in the next phase.
Soil Amendments During Vegetative Phase:
Mix 1 gallon of water with 100/ml of Microbe Builder and 1 Tbsp of SuperFood Veg. Apply as a weekly root drench or foliar spray to activate the soil microbiology.
Reproductive (Bloom) Phase
During the reproductive phase (also called bloom or flowering stage), your plants are becoming adults. Vegetative growth will slow as crops develop for harvest. In this phase plants typically need equal amounts of darkness and light, as well as nutrients high in phosphorus to encourage production. See our recommendations below for feeding your soil and plants.
After you have harvested your crop, chop your plants at the soil. This will allow the roots to continue to nourish the microorganisms in the soil during the pre-plant phase before the next growing season.
Soil Amendments During Reproductive Phase:
Mix 1 gallon of water with 100/ml of Microbe Builder and 1 Tbsp of SuperFood Bloom. Apply as a weekly root drench or foliar spray to activate the soil microbiology.
For a printable guide with instructions for each growth phase, download our Microbe & Plant Food Feed Chart.
The post Growing Phases appeared first on Grassroots.
]]>The post Understanding the Soil Food Web appeared first on Grassroots.
]]>
In a healthy soil food web, plants communicate with microbes in the soil by releasing hormones and other chemical signals to the microbes. The microbes receive these signals and respond, either by feeding the plant or defending it against disease by digesting minerals in the soil. At the end of the microbes’ life, the plants are able to absorb the nutrients from the decomposing microbes.
Unfortunately, conventional growing practices have made the soil devoid of microbes and caused the soil food web to become unbalanced. Here are a few ways:
Plowing or tilling
Tilling is the act of plowing or turning up the soil after each growing season. It’s a common practice for both commercial farmers and home growers alike. This practice releases carbon in the atmosphere, exasperating the global climate crisis. On a smaller scale, tilling destroys soil structure – killing essential microbes and negatively impacting plant vigor and yields.
Pesticides
Use of chemical pesticides has also had a major impact of Earth’s soil food web. While designed to eradicate invasive pests, pesticides have been proven to cause a decline in beneficial insect and bird populations. This major imbalance in the ecosystem impacts life above and below ground. By deteriorating the soil’s natural defenses, plants become even more vulnerable to pests, as well as diseases and stressors like drought and flooding.
Inadequate growing environments
We won’t argue that the ideal way to grow is directly in the ground, in living soil rich in beneficial microbes. Unfortunately, most native soil has a depleted food web. Soil can be reinvigorated with time and the right nutrients. For those who want to get growing quickly, container growing is a great alternative. But traditional growing containers can pose problems of their own. When growing in plastic or ceramic pots can prevent air flow. They can also cause dry pockets and root binding. That is not only bad for your plants, but also creates a constricted environment for life below the soil’s surface.
Here are some actionable steps you can take to implement regenerative practices in your garden.
Select the ideal growing environment.
If you’re going to grow above ground, there are alternatives to plastic, ceramic, and wood containers that not only are more beneficial for the soil but also are more affordable. Fabric pots and beds are made from breathable material that provides better aeration and air pruning for healthier roots. This allows the plants’ root systems to share space and nutrients. Fabric pots and beds ensure optimum moisture retention, eliminate dry pockets, and create the ideal environment for cultivating essential microbes.
Choose the right soil.
Soil itself can provide essential nutrients for microbes and plants alike. Nutrients from soil particles can be harvested by microbes like fungi and bacteria. Those microbes make the nutrients available for the plant to absorb.
Common soil ingredients include moss, sand, vermiculite, perlite, pine bark, and compost. The exact mixture of ingredients required depends on what you’re growing. Getting the mixture right is critical for plant success. Read more here about our recommendations on choosing soil.
Want to find the best soil for your region? Talk to your local garden supply retailer. Here are some retailers we recommend.
Feed your microbes.
When soil is rich in beneficial microbes and the soil food web is well-balanced, growers don’t need to use pesticides at all. A balanced soil ecosystem provides protection to plants from attack. It also acts as natural deterrent for weeds.
Feeding your microbes can at first seem complicated, because different species play a variety of roles during each phase of the growing cycle. Our line of Microbe & Plant Food line was designed to simply the process and alleviate the guess work for you. To see what products to use at each growth phase, check out our Feeding Chart.
Take the no-till approach.
Fight the urge to turn your soil or yank out plant roots after the growing season. Instead, chop off your plants at the soil line, allowing the roots to compost in the soil. By avoiding the intentional disruption of the soil, microbes will feed off the composting roots and later provide those nutrients to your next cycle of crops. Not only is this better for the soil food web and the environment, but it also saves you money on labor, fertilizers, and soil media.
The post Understanding the Soil Food Web appeared first on Grassroots.
]]>The post Washing Fabric Pots appeared first on Grassroots.
]]>
Why should I wash my fabric pots?
Depending on your growing method, you may want to remove residual chemicals that came from your nutrients and growing mediums before your next grow cycle. Give your new plants a fresh start with clean fabric pots.
How do I wash my fabric pots?
1. Pre-wash with a hose. Try to get the larger pieces of soil and plant material out of your pots by hosing them down.
2. Let them dry. After pre-washing, let them air dry for at least 24 hours. Then shake or knock out any remaining dried-out material.
3. Use an industrial washing machine. It’s ideal to use a separate washing machine to avoid any contaminants that might have been used to wash clothes. It helps to have an industrial model to handle the sediments of the growing mediums. If you’re growing on a small scale and having separate washing machines isn’t possible, that’s ok!
4. Fill the washing machine with fabric pots. Be careful not to overfill. In a basic washing machine, you can fit up to nine 30-gallon pots. Use your best judgement for your own unique washing machine.
5. Add baking soda and white vinegar. This is our suggested detergent. It’s natural and has no chemicals that might bind to the fabric. Alternatively, you can also use an organic detergent to remove the calcium and other residual materials from your pots, since water alone won’t quite cut it.
6. Wash in the coldest water on the heaviest setting.
7. It may require more than one cycle.
8. Air dry completely before putting away. No, do put your fabric pots in the dryer. Air dry completely. If you put away your pots before their 100% dry, it could invite mildew or mold.
How do I store my pots?
Store your fabric pots in a cool, dry place. Fold them, squish them, bundle them. Store them however you’d like.
The post Washing Fabric Pots appeared first on Grassroots.
]]>